You will need your kids, a sheet of a simple green paper of 110-160 gr (you can use any colour you like) a puncher (i used a christmas tree hole puncher), some cutted paper ornaments (i cutted out the figures of some wrapping paper) and sticky glue.
The kids like to punch as well as gluing and putting the ornaments onto the bookmark. If your kid is able to cut out the ornaments of the wrapping paper you will need scissors too.
2010. január 9., szombat
Funniest pots of all - handmade canpot
You will need a can, some paint, a brush, some paper ornament (i used yellow stars) a plant (i used baobab plant because it is easy to take care of in a flat too although i can be a tree as i saw it in Catalunya) and of course the most importaint is to have two little hands to help.


My son helped me with the paintig (with brush and hands too) of course with placing the stars (gluing with sticky glue) and he did the watering at the end. You can make as many ornaments and colours as much you want and of course you can update it to be seasonable (for example:in the summer we put flower ornaments on it and i used green and pink colours).


My son helped me with the paintig (with brush and hands too) of course with placing the stars (gluing with sticky glue) and he did the watering at the end. You can make as many ornaments and colours as much you want and of course you can update it to be seasonable (for example:in the summer we put flower ornaments on it and i used green and pink colours).
2010. január 6., szerda
Guarding angel

That was the moment when i started to make some little guarding angels that were hanged up at different points of the room until they found their place on our christmas tree (finally).
I used 3 wooden pearl, one of 1,6 mm and two smaller, a piece of golden string (30 cm), sticky glue and a piece of golden paper.I cutted out a bit more than a quater of a circle of the golden paper. I made a tapered phyramid of it and glued it. I splited the string and i made a knot at the midpoint of the splited lenght.
I pulled it throught at the paper pyramid and i pulled throught the biger wooden pearl. too. This was the head and the rest of the string was the hook of the figure (above the head).
I sallowed the two little pearls on each stings (there were two of it after it had been splited) and i made knots at the end.I drawed eyes and smiling mouths on their faces. They are the manifestation of our guarding angels.
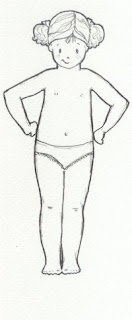
Paint, cut, glue
This snowman figure is perfect to practice cutting and coloring (painting). When i was a child - maybe 3 - we used to play with paper dolls. It was great to dress them (there were some collections of paper clothes but we made new clothes on our own too).
So when i found this snowman on this site it was nostalgic and great moment. My son likes to cut with his own scissors. He cuts every paper nowdays, this figure was perfect to practice.
After coloring, painting, cutting, it was time to glue it (with sticky glue). We talked about how to dress and what to wear during making the snowman.
Have a great time dressing!


Thanks for http://karacsonysk.blogspot.com and http://www.index.hu
Baking together - the easiest cookie of all

My son likes it with apple and/or cinammon but you can use jam, fruits, chocolate, cocoa powder as you like it.
The easiest part of the mixing is that there is no need of any mesuring you will need just a spoon and a cup of a yogourt.
You will need
one yoghurt (125 gr)
3 eggs
2 cups (cup of the yoghurt) of brown sugar (if you don't have it you can replace with white sugar)
1/2 cup of olive oil
10 g of baking powder
some limon zest
cocoa powder, jam cinammon, chocolate or anything else you like (if you use cocoa powder you should put just a spoon of the powder into it)
Put the yoghurt, the sugar and the vitellus into a ball and mix it until the sugar is melted (prox. 2-3 min.)
Grate some limone zest into it.
If you use a big pan you can place apple or anything else onto the top.
My son likes measuring the ingredients and put them into the ball. It was also interesting to find out how he can make whipe.
2010. január 2., szombat
Painting - from the begining


My son adores paints, brushes, papers (of different colours) so it was obvious to try them at the age of one.
Kids like mixing colours so i used tempera paints (the base colours, not more : red, blue, yellow) and different papers of different sizes. Pour some of the paints into plastic plates and prepare a kerchife made of textil (a useless, small shirt can be perfect too) and water. First you have to show how it works so paint lines or simple circles of one colour on the paper than give a brush to the kid. Importaint to explain all the time what you are doing and why to make the children understand what he sould do with the unknown things.
(Look, these are paints and we are going to paint a nice circle on the white paper. Which colour wold you like? Red? That is nice! Look, i put the brush first into the water, just a bit, than into the red paint. Look, i can also make circles in the paint. Than i put the brush onto the paper - look it's red colour on the paper and i'm making a nice circle.)
First time you should guide the tiny hands with yours but as time goes by (months) the moves will be so sure that there will be no need of help.
At first you should try handpainting, as well. The first big picture i did with my son was a picture of santa. I used 6 papers of the same size. 3 of them were the sky so my son painted them blue (with hands!) 2 were christmas tree, so all the paper were green (from top to the bottom) and the last one was santa itself with red handpaint on the paper. I helped with a black colour to draw the eyes and the stocks of the trees and i glued the papers into one huge picture (with cello tape).
With older kids you can make a picture of an angel or santa claus.
First of all
Staying at home with kids seems so easy of course because it is shown (on tv and in papers) like the easiest job of all. Celeb moms take the kids out for an icecream, or have fun in an adventure park. No babysitters, nanny or granny on the pictures, just laughing and happiness.
I used to be a private teacher (English teacher) in kindergartens, infantil schools and at families. I had to teach during an hour that can be difficult with kids at age 4-7.
I started to make small periods (5-10 min.) with different activities and that worked really well.
When my son was born i had to find out more to entertain him (entertain means - keep him interested in something).
This blog is about these activities which - i hope - will help a lot of teachers and mothers staying at home with the kids.
Don't forget - staying with kids can be very frustrating so don't feel ashamed if you have bad day.
Feliratkozás:
Bejegyzések (Atom)